Sunday, February 6, 2011

I wanna be Miss Mustard Seed

Have you ever stumbled across a design blog and thought - YES! This is what I want my room to look like. We live in a very traditional house, in a traditional neighborhood, in a traditional city, in a traditional state!

I have been trying to figure out - what is my style, what makes my heart stop? And then I saw a picture of Miss Mustard Seed's dining room - there it was. I was mesmerized. I have redesigned my space with VERY strong influences of MMS.

So, here it is - my dining room ala Miss Mustard Seed...

Let's start with the old: It was fine. I mean, I liked it - but I didn't love it. I wanted to love the space. It is the first room you see when you walk in our front door and I wanted it to feel more like a space you wanted to be in - not just walk on by! I made the curtains about a year after we moved in the they are nice - but fancy. They are aqua / brown and have a silk lining and have nice pretty baubles hanging from the trim. So out with the old and in with the new:


Shall we take a tour? Where are all the MMS influences?? I would have loved to have been able to paint my table/china cabinet. The mister almost went into cardiac arrest when I suggested it - so that will remain the same (for now!) Here is the vision, the start of it all - Miss Mustard Seed's Gorgeous Dining Room!
What's not to love, right? Well, I started with the curtains. I had seen the fabric MMS used at Joannes and a couple of other online sources. I liked it - but wasn't as big a fan of the birds as I though I would be when I saw it up close. After a few hours online I found this wonderful fabric at Fabric.com, they had it on clearance for 11.98 a yard. Joanne's had the same fabric - but definitely not the same price! When I went to place my order they had a couple specials going on - free shipping (cha ching) and if you spent more than $100 you could take an extra 25% off! Seriously - I ended up getting 12 yards for $107!!!
They came out - exactly how I wanted them (I followed along the same curtain making instructions, provided by MMS here). You see that lovely mirror on the wall...can you believe that many years ago, my mom purchased it from Home Interiors. It was originally a shiny, shiny brass color. After some silver spray paint made for plastic (because, yes, it was plastic) and some black glaze, it is now a tarnished silver look.

Next, I tried my hand at finishing a piece of furniture - improving it with the magic of paint and glaze. This corner unit we have had since we moved in together, before we got married. It was a lovely shade of avacado green - here is the transformation:

Up close and personal...MMS has some great tutorials on painting - you can find them here and here.

Here are some more MMS inspiration areas in the dining room -
Artwork: I found this image from the amazing Graphics Fairy - a close and personal friend of MMS!! I printed the image out on heavy resume paper and then put it in the frame I got from the local Goodwill store. Of course the frame was originally gold, I painted the outside silver and the inside trim a nice french blue. The candlesticks were another vintage Home Interiors plastic gold travesty. Like the mirror, I painted and glazed and now have tarnished silver loveliness on the wall. This is another corner of the dining room - I haven't painted this piece, because I don't know if it is staying in this room for the long run. But it is a great spot to hold some of my smaller dishes. The plates on the top shelf are Ironstone - and we all know how much MMS loves her ironstone. Most of the plates and goodies that I have found to decorate with I discovered at my local goodwill.The place settings that I have put together are a study in thriftyness. The bottom chargers came from Hobby Lobby and are...shhhh...plastic. I have a cream colored plate next - picked those up at Tuesday Morning for about 3 buck a piece. The blue and white plates that are next I got at Ross - for 2 bucks a piece (wish I had someone to pass dishes down to me - but my families budgets were more like 70s corelle ware than lovely Enlgish transferware!) The cute silver dishes on the top came from my very favorite thrift store and were only 85 cents a piece!! Here is MMS's version:
Pure loveliness, right. I have actually started a collection of the plates that you see her using in her place setting - I saw a stack of three on the shelf at Goodwill and scooped them up - I didn't even realize it until I started doing this post that 1.) I bought a bowl that matches them about 10 years earlier and 2.) That they were the plates MMS uses! Wierd how that worked out! The Hurricanes on the table I picked up on clearance from JC Penney (while I supposed to Christmas shopping) I found the lettered balls, once again at my very favorite thrift shop - a little typography for MMS!
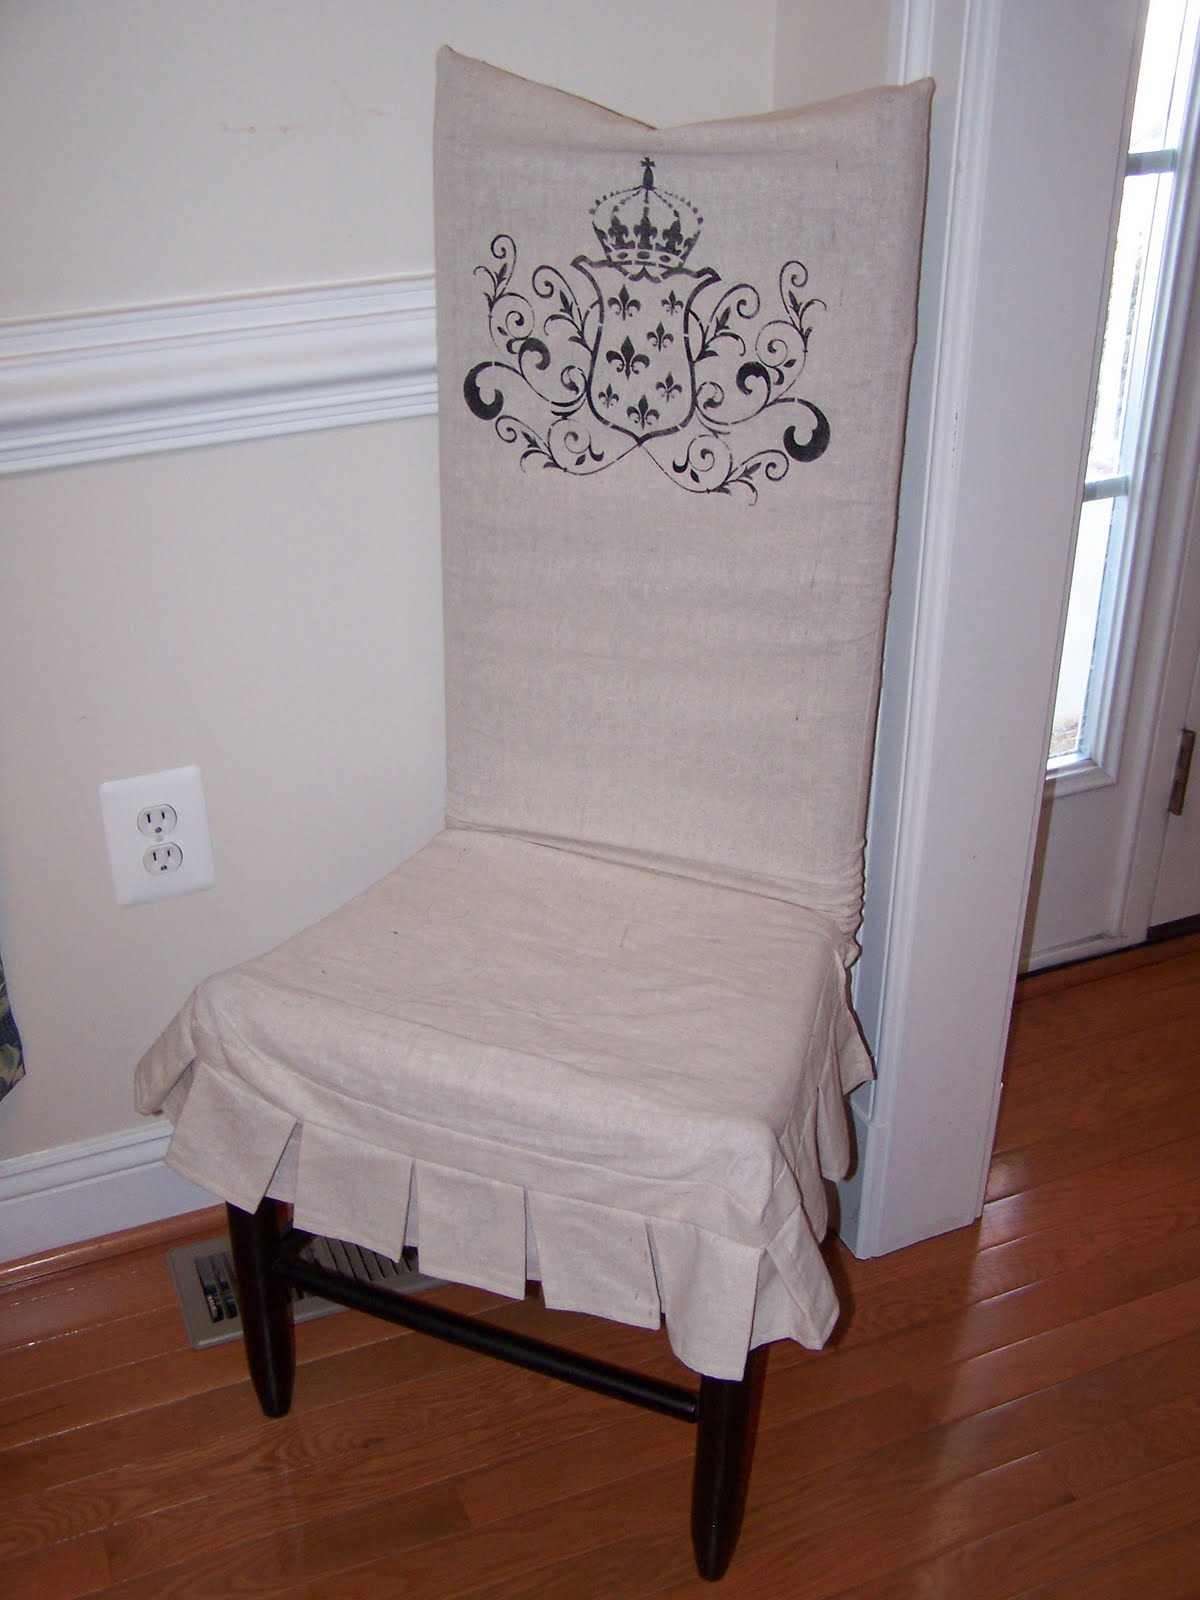


This little chair was probably one of the first projects I had tackled. I made the slipcover out of muslin and the skirt on this little lady is very reminiscint of MMS and her wonderful slips - she has some great tutorials here.


My final MMS inspiration Vignette - I didn't paint this piece either - I loved the patina on the finish and just didn't want to change it - All of the items (chest included) came from the thrift store. Seriously, I love that place. I also included a wreath - made with sheet music to incorporate MMS' love of sheet music. Here are some more close up shots -
I just love the title of that book - "Your House in the Country." It is full of very practical advice for those housewives, making due in the 1930s! I don't live in the country - but if you asked some of my co-workers, they would swear I did. Spotsylvania county sure sounds like the country to those folks in D.C.! (did you notice the plate??? Very MMS!)

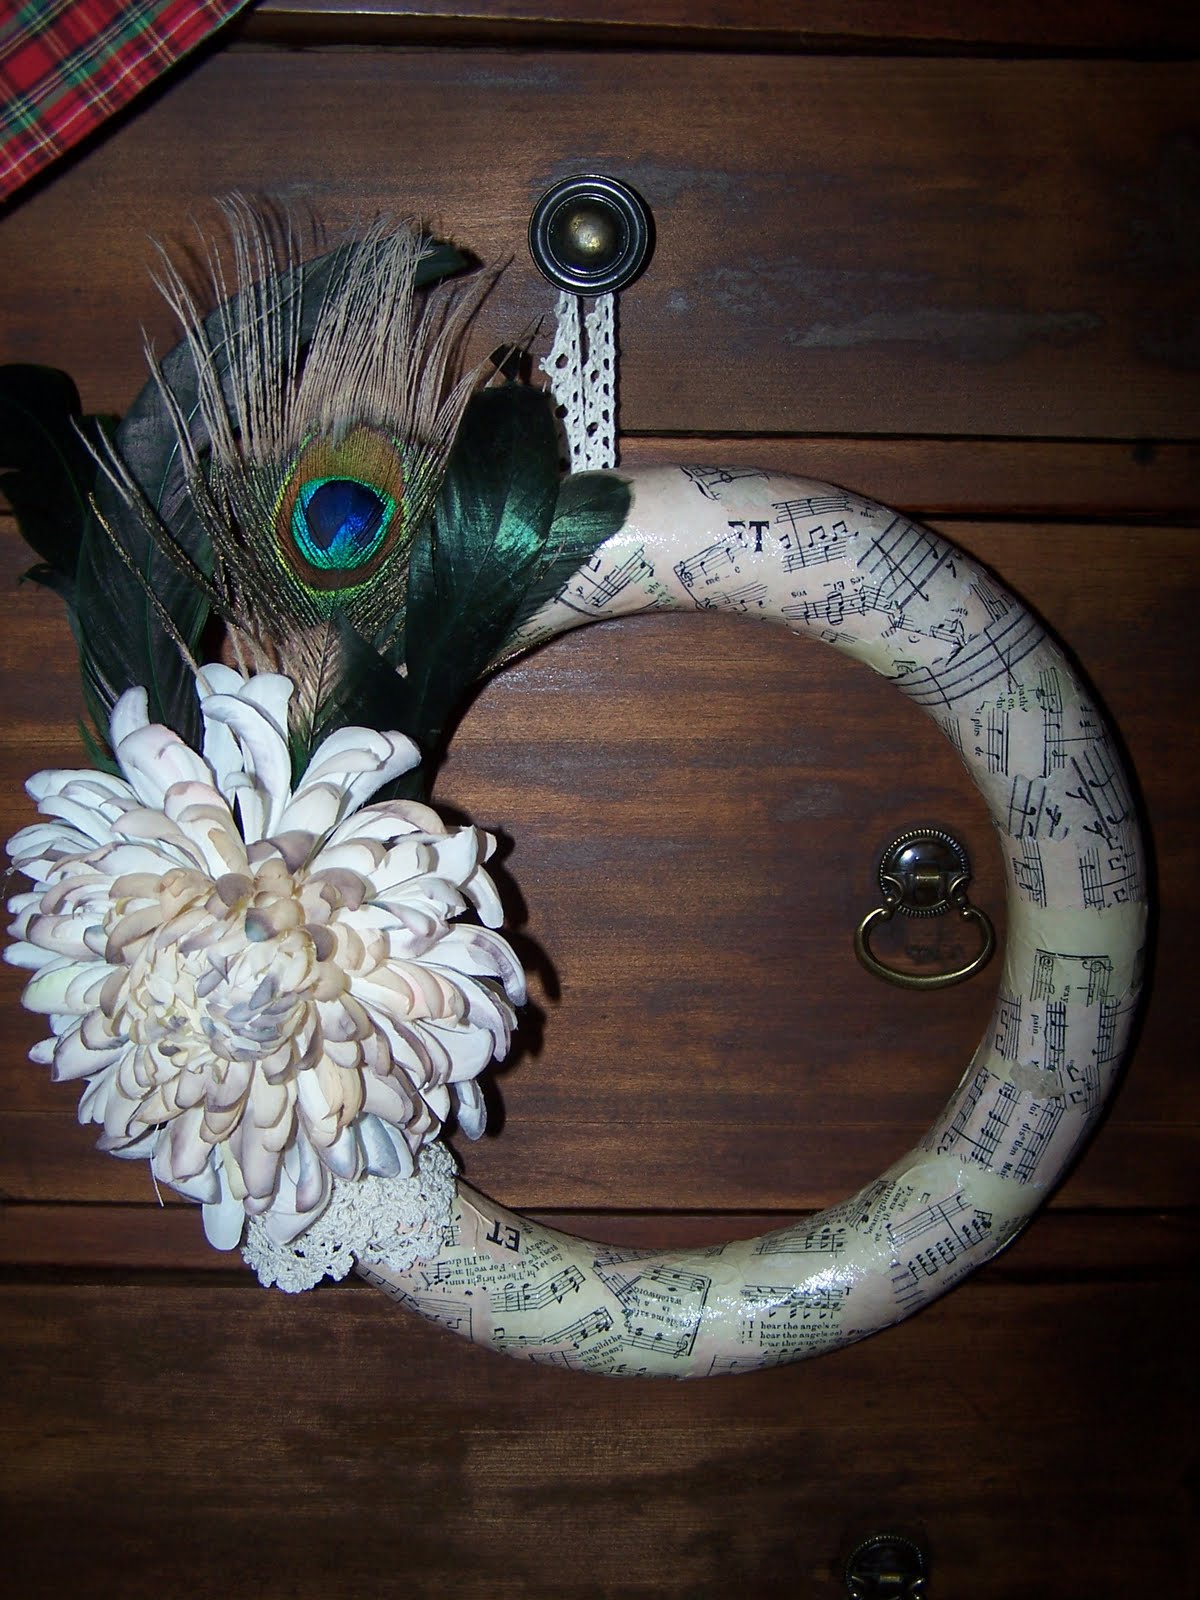
Here is a better shot of the wreath I made. A little bit of modge podge, strips of sheet music paper, and some other pretties - and I have quite a nice little wreath!

So, that about sums up my obsession with Miss Mustard Seed. I am linking up to here "Copy Me" challenge post. I hope she knows, I took her rather literally. I am so please with my dining room, I can hardly stand it. I just sit in there with a stupid grin on my face. Miss Mustard Seed, I hope you are proud of your influence on me and take my "copying" as a true tribute to your abilities! I am going to leave this long, long, long post now - with one question...My dining room chairs - blue velvet or the original cream?

Thursday, January 27, 2011

Valentine's Day Banner

I am not a big decorator of all the holidays - the biggies, yeah...but Valentine's Day usually doesn't make the cut around my house. But, we have a snow day and I had some great supplies laying around with nothing to do - so, why not! Here is what I used to make my "Be Mine" Valentine's Day banner.

First up was the red jute/burlap - I got mine from Joanne Fabric - in the remnants bin...
Can you believe the price!! I only used about 1/8 of a yard...so it was about $ .30 worth of burlap!

I made a pattern out of vellum paper - I used the size of a small paperback book at my template. Here are the dimensions -
I cut out 6 "flags" to use for my banner. Next, I reverted back to my childhood - and tracing, using the window as my lightbox. I cut each letter from the paper and taped it to the window and then taped a "flag" over that and using the handy, dandy sharpie - traced away!

It only took a couple of minutes to trace each letter. After I pulled it off the window I went back over each letter to make sure it was really covered by the sharpie. When I had all of my letters lined up, I felt that it needed a little more oomph...so on to the next set of supplies - glue and ribbon...
I glued ribbon around the edges just to finish it off. I am not good with fuzzy edges - so I also used fraycheck on the ends of the ribbons, just to make sure! Once I had it all done, I got out the jute string and created the final banner. I also made the heart out of some other scraps I had laying around. Who knows, I may start decorating for all the holidays now! Here are the final shots:

Wednesday, December 22, 2010

Homemade Holidays - the gifts! Part 3

Scarves, scarves, scarves...I have only finished 2 so far. Hope to get some more done before time is up!!!

These were so much fun to make and weren't too difficult either. I hope the recipients love them too! Maybe I can get the ladies to model them after they are opened!

Tuesday, December 21, 2010

Homemade Holidays - the gifts - Part 2


Miss Alexis is the princess in our family - the only girl, surrounded by boys! I love that I am her Godmother and I love that I can make girly things for her!!! She just started dance lessons - so I thought she definitely needed a little bag to carry her ballet shoes in.

I started with some soft fine-wale corduroy. I have been making bags and purses for several years, so I didn't use a pattern, I just started cutting. I used an image from the Graphics Fairy for the ballerina and added her initial to the bag (an iron-on, darn I wish santa would bring me an embroidery machine!!!) Of course the tulle around the top!

Here are some up close shots of the ballerina image. I added the tulle skirt and crystals for that little extra something!

Monday, December 20, 2010

Homemade Holiday - the gifts! Part 1


A pillow for Jackson! My nephew is a cowboys fan, God love him! It hurt my hands a little to touch this fabric, but I pushed through the pain and created this pillow for him as one of his Christmas gifts. This boy is an amazing kid - the struggles that he has had to endure and he has fought through make him an inspiration.

At four months old, Jackson contracted meningitis. We almost lost him - but he hung on and fought! He came away from that experience with some real challenges - loss of hearing, some brain damage and some real physical challenges...but that didn't stop Jackson.

This is a picture of Jackson this spring playing baseball for our Little League's Challenger division. He is an amazing kid, I love him dearly and this little pillow is just a small token of how much I love him! Jackson has a lot of struggles still to face and his health is a question every day - every sniffle can send him back to the emergency room - but he is a true fighter and a hero!

Sunday, December 19, 2010

Thrift Store Treasures


When I saw this metal "scoop" just laying on the rack at our local Goodwill store, I understood why so many people had passed it by. Originally, it was painted a lovely mustard color...almost blindingly yellow. I wish I had remembered to take a picture so I could show a dramatic before and after - I just get so darned excited!

Anyway, I got this home and mixed some paints together to get the blue color I wanted. I painted and painted and painted - it took a few coats to hide that yellow! Once I got it covered and the paint dried, I used some antiquing stain to highlight the really cool details.

I am so happy with it! Can't you see a little bird making its home in that nest?

Saturday, December 18, 2010

Homemade Holidays, Part 3


Sheet music, sheet music, sheet music...I know it was Miss Mustard Seed that started me on the hunt for sheet music. She has done some really amazing things with it! If you haven't checked out her blog yet, I highly recommend it! I think this wreath is the first sheet music thing I created. I started with a dollar store foam wreath - modge podge - and very sticky fingers! The sheet music that I used for this wreath was images I got from the Graphics Fairy - wow, another great site that you MUST visit!!!

After I got the sheet music (which I cut into thin strips to make it easier) glued on, I thought it needed a little something extra - so I added the flower, doily and feather - which were left overs I had laying around the ole craft room. I thought it went nicely with the NOEL frames, don't ya think?

Friday, December 17, 2010

Homemade Holidays Part 2


Yesterday I showed you the sheet music NOEL frames that I created for my 1 (so far!) holiday display. Today, I want to show off my toile candles. These were super easy to make - and because I got carried away, I didn't stop to take pictures of the process. There are many, many, many tutorials on how to make these candles - so don't stress! I purchased the candles and the tissue paper from Hobby Lobby. I started with the plain cream candle, cut the tissue paper to size, then grabbed the heat gun from my supply cabinet and went to work.

It really only takes a few seconds of the heat gun heating the paper to get a thin layer of wax to form around the tissue paper. I think i finished the two candles in less than 10 minutes. I love that they look great for the holidays - but the toile is not holiday specific and I can use them again later!!!

Thursday, December 16, 2010

Homemade Holidays

So far, this is the extent of my holiday decorating. We have decided to install hard wood floors in the house - they come to install tomorrow!! Therefore, no tree, no decorations - as all the other rooms had to be emptied out to make way for the new floors!

I had to have some Christmas showing around the house so the chest in the hallway got the treatment. I am not sure that it will still look like that by the weekend when I have ample time and ability to decorate the whole house, but I am happy with it for now!

With the exception of the tablecloth, I "crafted" everything you see. I am going to start with the NOEL frame set. I bought the frames from Joann Crafts for $1 each. They might have even been on sale for less, I just don't remember. They had been sitting in my craft closet for quite some time. I used sheet music from an old hymnal that I picked up at the thrift store (which, by the way, is where I got the chest) and decopauged the sheet music pieces randomly all over the frame. I finished by hot gluing red velvet ribbon around the outside of the frame.
I cut out the N-O-E-L with my handy dandy cricut and used some scrap paper to fill in the back of the frames. I really like the way they turned out!

Wednesday, December 15, 2010

Pottery Barn Inspiration Hand Towel


When I saw the cute ticking strip hand towels in the Pottery Barn Catalog I knew I needed them...but, as with most item in the catalog - I could not justify paying for them! So, I made my own version. I think I may have mentioned before that I do not have an embroidery machine - so I knew that monogramming was out. Instead I used a vintage tea label graphic from the Graphics Fairy instead.

I like my version just fine!

Eeeek - Long time no post!

I hadn't even realized that it has been August since I have posted anything. Where have I been? I don't really have a good answer to that question...running around like a chicken with my head cut off?? Being the wife of a high school football coach can be tyring - and busy...especially when the season doesn't go as you had hoped! So, I guess that is where I have been. Dutifully sitting in the stands, cheering on the boys of fall - no matter the outcome!

The same goes as being a mother of a baseball loving son, playing travel baseball throughout the fall season. My weekends this fall consisted of attending a football game Friday night, hosting an after game coaches "pig out" at our home - which usually lasted late into the night. Then getting up before light on Saturday morning to drive to the baseball field - to cheer on the "boys of summer!" - once again no matter the outcome, and another trying season!

Not to forget the little guy (who is not so little anymore!) Being present at all of his football games and cheering my head off! Of the three - his team had the most success this season - they ended up coming in 2nd place! I watched my baby (who was the smallest on the team) - who was soooo timid last season turn into a real football player. Of course after he made a tackle - he was always checking the stands to make sure I had seen it!!!

So, I guess that is where I have been for the past few months. I did manage to squeeze a few crafts and projects in. Today, I am just going to relax and enjoy the moment - look back at the good times we had this fall. As a parting "shot" This is my baby - dressed as Gene Shalit for halloween!

Monday, August 9, 2010

Beautiful Mannequin

I have had a simple craft paper mannequin form in my craft room for about 5 years now. I always knew I wanted to do something with her - but was never quite sure what. Thanks to the wonders of the blogosphere, I discovered the Graphics Fairy and used vintage labels from her site to decopauge the heck out of this little beauty. I am so happy with how she turned out.

I added the pink flower just to spice her up a bit more.

Goodwill Treasures

I have big plans for this lovely piece. I picked this up for 50 whole cents! I see some spray paint in its future, don't you. I love the fact that it is made in the U.S.A. circa 1977! It had a "sister" at Goodwill, but she didn't have the flowers in the center and was definitely NOT as cute.

Isn't this little angel put sweet - it looks like he is blowing you a kiss! I think he may have been a dollar - possibly 2, but I couldn't resist.
The candlestick "in its original form" was a very dark and ugly wood color. A little spray paint and sandpaper was all it took to purty her up! The bucket was in the dollar bins at Michael's a while back. I covered it with moss ribbon and made the flower from white muslin.

Just a few things to make me happy, keep me busy, and keep me sane!

Simple girly artwork

I know I need to start every post with the disclaimer, "Why don't I have a little girl?" Well, I don't. Two boys - who are definitely ALL BOY! So, in order to claim my little piece of happiness, I create in my craft room - and generally create very girly things.

I created this very simple piece of artwork with one 10x10 canvas, 1 sheet of scrapbook paper and 16 small flowers.


I believe I got the canvases from Joann's - buy one get one and I know I picked up the scrapbook paper there for about 25 cents. The flowers were a close-out special last year from Stamping Up! I bought about 6 or 7 packs of them, knowing that someday I would put them to good use. Now, If I only had somewhere to hang this little cutie!

Sunday, August 8, 2010

Lavender Sachets

What is all that racket? Oh, sorry, that was just me...sneezing my head off.

I love the way lavender smells. Fresh lavender is wonderful, but apparently sends me into violent sneezing fits!

I made the lovely sachet above using a piece of linen and an image I found on the net. The image was ironed on using ink-jet t-shirt transfer paper. After it was sewn and cooled I thought a little sparkle would dress it up just a bit more...so out came the crystal stickles. I love it! Here are a few more that I whipped up...


Tuesday, May 25, 2010

Ruffled Roses Inspiration

This shirt, found in the Soft Surroundings catalog, serves as the inspiration for a handy new little bag I made today. I got some mens shirtware inspired fabric from joann's and started cutting out the shape of the bag - and then started ripping strips for the roses. I like the first attempt - but think future bags might need to be a little smaller?? What do you think?

Friday, May 21, 2010

Baseball - the meaning of life?

Crafting has been seriously put on hold the past few weeks. My life has been at the baseball field. I really am one of those baseball moms. I travel from ball field to ball field and yell like hell for my kids - good, bad, ugly. The picture above is Cody getting ready to hit his third home run. 2nd for the season. So far this Spring season he has hit 4 whoppers over the fence. It is great - but not the be all end all for me. I think I feel so much more proud of him - in the dugout - on the bench getting his teammate riled up for the inning.

We have been trying to instill the feeling of leadership, sportsmanship, and love of the game in him rather than just being that kid who can go out and knock one over the fence (although - let's be honest, I am sure it feels pretty awesome. I think he is starting to get it. What it means to be a positive force on the bench. Bring your teammates up - not down. Jonathan is just starting to get into baseball - all the other baseball moms call him smiley. Jon doesn't care if he gets a hit, doesn't care if he crosses home plate - for him it is the little things. Getting his bat on the ball - no matter that it went foul and counts as a strike. When he makes contact, the smile on his face truly brings tears to my eyes.

I have only missed like one or two games in my kids baseball careers. I am the scorekeeper for both teams and I wouldn't change anything about it. I love it! I love it! I love it!

Do you remember the first time your child looked at you with pure joy and pride in their eyes? I do and I get choked up when I think about it. For Cody - he was about 3 1/2 and we were at the mall. They had one of those indoor playgrounds. His baby brother was about a month old and we had gone to grandma and grandpa's for a little break. Grandpa and I were at the mall watching Cody play on the giant pieces of fruit! The huge slice of watermelon was the one piece that Cody couldn't get up. He struggled and struggled and kept falling off. He never gave up! Finally after about 3o minutes of trying he finally pulled his chubby little legs up and stood on top of that watermelon - like he had just climed Mt. Everest. He looked at me with that look - and said "I did it Momma, I did it!"

For Jon - it was during his first flag football season. Jon is more about "fellowship" that being that star athlete. Coach found a good spot for him - he played center. He could be part of the action - but didn't need to be so intense. Well, toward the end of the season he was on defense and ran down the ball holder and finally got a hold of the flag. I will never, never forget the light shining from my son's face. It was like the heavens opened and God sent a sunbeam to little Jon. I can tell you that I was not the only one in the stand with tears in their eyes. If you looked up joy and pride in the dictionary - his face was there beaming. As he ran by he asked - "did you see me mom?"

Friday, April 23, 2010

Glitter in the air


I don't know about everyone else out there - but Pink's new song "Glitter in the Air" really gets to me. I heard it two or three times before I found out it was her. "Have you ever held your breath and asked yourself, will it ever get better than tonight?" She is usually know as such a rocker chick. Glad to know she isn't afraid to show her soft vulnerable side as well. I think I will sign off and go listen to the song again!

Tuesday, April 20, 2010

My very First Slipcover!

I have seen so many others out there in blog land making the cutest slip covers. I finally just decided to give it a go. I am a crafty person, I like to sew, I can make a slip cover, right???

I purchased some muslin from Joann Fabrics for $2.99 a yard (?) with a 40% off coupon - so the fabric was way cheap! I didn't follow a pattern, I just started cutting pieces of muslin and pinning it all together backwards. It took awhile but turned my boring, formerly green (now spraypainted black) ladderback chair into a real charmer~

I really didn't want the chair to get lonely, stuck in the corner by itself - so I whipped up this pillow to sit on top. I made the "roses" out of some ribbon - gathered along the bottom edge. It added just that something!